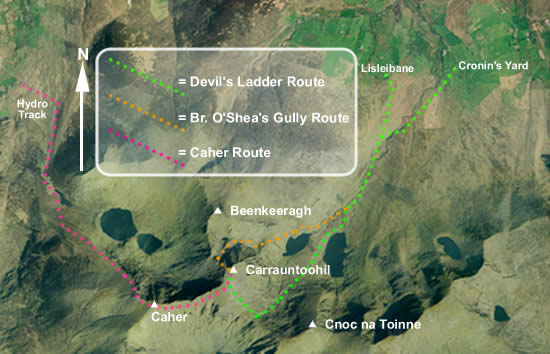
CARRAUNTOOHIL ROUTE DESCRIPTIONS
This section of our website describes three of the most popular routes up Carrauntoohil (1039m). The route descriptions given should only be used in conjunction with the appropriate map (see individual route descriptions for details). It should be pointed out that regardless of height, Carrauntoohil is a challenging mountain to ascend compared to many Irish summits. If you are in any doubt whatsoever about your ability and experience you are strongly advised to go with a more experienced walker or consider hiring a guide. Please contact us for a list of those offering guiding services on the mountain.
Dogs: Please note dogs are not permitted on Carrauntoohil. Please respect the wishes of the local landowners – without their goodwill, access to the mountain would not be possible.
DEVIL'S LADDER ROUTE
Overview:
The traditional “tourist route” up the mountain, the Devil’s Ladder route has now become badly eroded in places and the Devil’s Ladder gully itself demands care due to its loose condition. Allow 6 hours for the round trip.
Maps:
THIS ROUTE DESCRIPTION SHOULD ONLY BE USED IN CONJUNCTION WITH ONE OF THESE MAPS:
– Harvey ‘Superwalker’ 1:30,000 “MacGillycuddy’s Reeks”
– Ordnance Survey Ireland 1:50,000 Discovery Series Sheet 78
– Ordnance Survey Ireland 1:25,000 Map “MacGillycuddy’s Reeks”
Dogs:
Please note dogs are not permitted on Carrauntoohil. Please respect the wishes of the local landowners – without their goodwill, access to the mountain would not be possible.
Details:
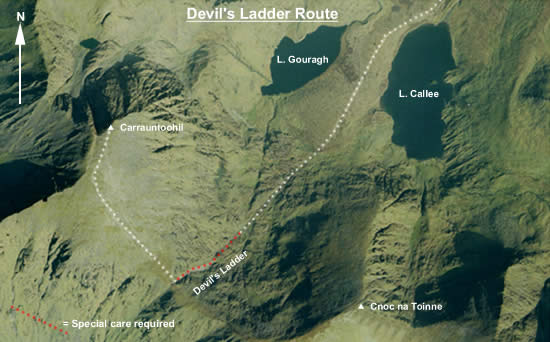
Start at either Lisleibane (Grid Ref. V827873) or Cronin’s Yard (Grid Ref. V837873). From Lisleibane follow the obvious track into the Hag’s Glen. Alternatively, from Cronin’s Yard follow the path until you meet the main Hag’s Glen track shortly after the Gaddagh River crossing (Grid Ref. V827864).
Continue into the Hag’s Glen, crossing the ford at Grid Ref. V821854 (demands care after prolonged heavy rain) and passing between Loughs Gouragh and Callee. After ascending a short rise the path becomes less distinct as it crosses an area of waterlogged ground before arriving at the foot of the Devil’s Ladder. The Devil’s Ladder itself is a steep gully filled with loose scree and boulders. It is now quite unstable in places and care should be taken, particularly when icy or in wet weather. Although it is tempting to leave the bed of the gully for what appears to be better ground on the flanking slopes (particularly in descent) this should be avoided. Stay alert to the risk of rocks being dislodged by other parties above you, or onto other parties below you.
In recent years severe erosion has occurred on the Devil’s Ladder itself, particularly in the upper section, and there is a significant amount of loose rock and scree present therefore caution should be exercised. Whilst many people continue to use the route safely, others have started to use the old “Bothar na Gige” zig-zag route on the flank of Cnoc na Toinne as an alternative. It should be pointed out that this route is not without its dangers either, particularly in wet or icy conditions, and there have been a number of accidents there in recent times as a result of simple slips. It also involves a significant amount of extra ascent in the overall climb compared to the Devil’s Ladder itself. Although it is a very old route, Bothar na Gige had fallen into disuse until fairly recently, however since regaining a degree of popularity it has also been subjected to a high degree of erosion and is now loose and slippery in places.
At the top of the Devil’s Ladder bear right onto the long summit slope of the mountain. From an initially vague appearance, the track becomes more distinct as you gain height. Although it branches in several places, all variations lead eventually to the summit. In poor visibility beware of heading too far to the left of the track and onto the dangerous ground above Curraghmore, or too far to the right where a narrow track leads across the face of the mountain towards the ‘Heavenly Gates’.
Return via the same route or the Brother O’Shea’s Gully route.
BEWARE!
The summit itself is surrounded by steep ground and extreme caution is required when commencing your descent, especially in poor visibility. Note that there are NO safe descent routes anywhere to the North, Northeast, East or Southeast of the summit. Always carry a map and a compass and have at least one competent navigator in your group (ie. capable of accurate navigation in all conditions, including white-out and darkness).
Initial descent bearings from the summit are as follows:
1. For the Devil’s Ladder, follow a magnetic bearing of 192° until you meet the track, then follow it as it trends SE to the top of the Devil’s Ladder.
2. For Brother O’Shea’s Gully follow a magnetic bearing of 230° for 50m before turning to 308° and descending steeply towards the top of the gully
3. For Caher follow an initial magnetic bearing of 230° for 50m. Next follow 195° for approximately 200m before following the rim of Coomloughra as it veers away to the right.
Disclaimer:
This information is provided in good faith and is believed to be accurate. In deciding to use this route description you have agreed that Kerry Mountain Rescue Team or the author of this text cannot be held responsible in any way for the accuracy of the information contained herein, or for any accidents which occur to a person using this route description, howsoever caused.
BROTHER O'SHEA'S GULLY (CUMMEENOUGHTER) ROUTE
Overview
A route now used by many as an alternative to the Devil’s Ladder. It takes in some spectacular mountain scenery, including a close-up view of Carrauntoohil’s precipitous NE face. There are a number of short but slightly exposed rocky steps which require easy scrambling. The final summit slope can be dangerous in icy conditions. Allow 6 hours for the round trip.
Maps:
THIS ROUTE DESCRIPTION SHOULD ONLY BE USED IN CONJUNCTION WITH ONE OF THESE MAPS:
– Harvey ‘Superwalker’ 1:30,000 “MacGillycuddy’s Reeks”
– Ordnance Survey Ireland 1:50,000 Discovery Series Sheet 78
– Ordnance Survey Ireland 1:25,000 Map “MacGillycuddy’s Reeks”
Dogs:
Please note dogs are not permitted on Carrauntoohil. Please respect the wishes of the local landowners – without their goodwill, access to the mountain would not be possible.
Details:
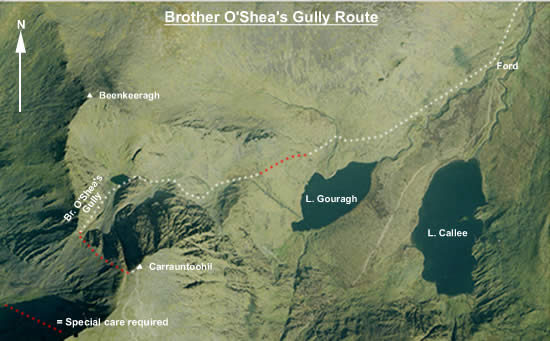
Start as for the Devil’s Ladder route before branching off rightwards just before the ford at Grid Ref. V821854. Cross an area of flat open ground on a line roughly parallel to the river (no distinct track) before commencing a rising traverse across the slope above Lough Gouragh. There are one or two places where the route is quite exposed and several short rocky steps require some easy scrambling (most can be avoided by minor detours). Shortly afterwards you emerge onto an area of flat ground known as the ‘first level’ (Grid Ref. V809849) from where some spectacular views of Carrauntoohil and the Hag’s Tooth Ridge can be had on either side of you.
Ahead and to the left you will see a track running up the scree slope immediately beneath the NE face of Carrauntoohil towards the ‘second level’, from where a waterfall emerges. On reaching the second level, another badly eroded path leads up a short steep slope to the ‘third level’ where the clear and deep waters of Cummeenoughter Lake (Grid Ref. V803848) can be seen. This lake is reputed to be the highest in Ireland and is coloured a vivid blue by minerals.
From here you bear leftwards up the broad slope of Brother O’Shea’s Gully, hemmed in on your right by the cliffs below the knife-edged Beenkeeragh Ridge. The lower sections of the gully are comprised almost entirely of coarse scree however towards the top the slope is still grassy in places, although now becoming badly eroded. In clear weather you may catch a glimpse of the summit cross on the skyline to your left as you ascend the gully. You will also pass Curved and Central gullies on your left, both of which are steep, loose and not recommended for inexperienced parties. Towards the top of the gully care is demanded due to the steepness of the ground and the degree of erosion, particularly in winter conditions.
When you reach the col at the head of the slope you may, if lucky, be greeted with a spectacular view down into Coomloughra with Dingle Bay and the Brandon group to the Northwest. From here you scramble leftwards up broken rock towards the summit. This section can become dangerous when icy, and there is a considerable amount of exposure to your left. You will pass the top of Central and Curved Gullies before emerging onto the summit.
Return via the same route or the Devil’s Ladder route.
BEWARE!
The summit itself is surrounded by steep ground and extreme caution is required when commencing your descent, especially in poor visibility. Note that there are NO safe descent routes anywhere to the North, Northeast, East or Southeast of the summit. Always carry a map and a compass and have at least one competent navigator in your group (ie. capable of accurate navigation in all conditions, including white-out and darkness).
Initial descent bearings from the summit are as follows:
1. For the Devil’s Ladder, follow a magnetic bearing of 192° until you meet the track, then follow it as it trends SE to the top of the Devil’s Ladder.
2. For Brother O’Shea’s Gully follow a magnetic bearing of 230° for 50m before turning to 308° and descending steeply towards the top of the gully
3. For Caher follow an initial magnetic bearing of 230° for 50m. Next follow 195° for approximately 200m before following the rim of Coomloughra as it veers away to the right.
Disclaimer:
This information is provided in good faith and is believed to be accurate. In deciding to use this route description you have agreed that Kerry Mountain Rescue Team or the author of this text cannot be held responsible in any way for the accuracy of the information contained herein, or for any accidents which occur to a person using this route description, howsoever caused.
CAHER (COOMLOUGHRA) ROUTE

Overview:
A fairly long but relatively straightforward route which follows the southern rim of Coomloughra and takes in the triple summit of Ireland’s third highest mountain Caher (1001m) en route to the summit of Carrauntoohil. For more experienced parties the complete Coomloughra Horseshoe – which includes Ireland’s three highest peaks – is an option. This takes in the spectacularly exposed knife-edge of the Beenkeeragh Ridge, but this is only for those with a head for heights and should not be attempted at all in windy conditions. Allow 6 hours for the Caher-Carrauntoohil-Caher trip and 8 hours for the full horseshoe.
Maps:
THIS ROUTE DESCRIPTION SHOULD ONLY BE USED IN CONJUNCTION WITH ONE OF THESE MAPS:
– Harvey ‘Superwalker’ 1:30,000 “MacGillycuddy’s Reeks”
– Ordnance Survey Ireland 1:50,000 Discovery Series Sheet 78
– Ordnance Survey Ireland 1:25,000 Map “MacGillycuddy’s Reeks”
Dogs:
Please note dogs are not permitted on Carrauntoohil. Please respect the wishes of the local landowners – without their goodwill, access to the mountain would not be possible. Thanks.
Details:
Start at Grid Ref. V772871 where a locked gate leads to the steep concrete road known as the ‘hydro-track’. This track initially gives an unmercifully steep slog up the lower slopes of Skregmore before bearing right, easing off in gradient somewhat and finally emerging at Lough Eighter.
From here, bear rightwards across open ground towards the spur leading to Caher. As you ascend the long spur, the ground to your left steepens until you are eventually walking along what amounts to a cliff-top track. Care is required here, especially in windy conditions.
The track continues across the three summits of Caher before descending slightly to the col between Caher and Carrauntoohil (Grid Ref. V799840). Careful navigation is required here in poor visibility, particularly when travelling in the reverse direction.
Continue up relatively easy ground to the summit of Carrauntoohil.
Return via the same route or continue around the Coomloughra Horseshoe (see below).
BEWARE!
The summit itself is surrounded by steep ground and extreme caution is required when commencing your descent, especially in poor visibility. Note that there are NO safe descent routes anywhere to the North, Northeast, East or Southeast of the summit. Always carry a map and a compass and have at least one competent navigator in your group (ie. capable of accurate navigation in all conditions, including white-out and darkness).
Initial descent bearings from the summit are as follows:
1. For the Devil’s Ladder, follow a magnetic bearing of 192° until you meet the track, then follow it as it trends SE to the top of the Devil’s Ladder.
2. For Brother O’Shea’s Gully (and on to the Beenkeeragh ridge and the continuation of the Coomloughra Horseshoe) follow a magnetic bearing of 230° for 50m before turning to 308° and descending steeply towards the top of the gully.
3. For Caher follow an initial magnetic bearing of 230° for 50m. Next follow 195° for approximately 200m before following the rim of Coomloughra as it veers away to the right.
Coomloughra Horseshoe
The complete Coomloughra Horseshoe is one of Ireland’s classic ridge walks, however its seriousness should not be underestimated. It should only be attempted by experienced parties as it is physically demanding and takes in the notoriously exposed Beenkeeragh Ridge. In icy or windy conditions it becomes even more serious, and in the winter months the short days mean that a party must move quickly in order to complete the route in daylight.
It can be completed in either direction however many parties prefer to do it in the clockwise direction in order to gain height quickly on the steep ascent of Skregmore, tackle the major difficulties with plenty of time in hand and give a comfortable descent down the Northwestern spur of Caher.
The Beenkeeragh Ridge itself is knife-edged in places, and looks down over precipitous drops into both Coomloughra and Cummeenoughter. Although there is a track in places, the exposure is considerable and scrambling is required. In icy or especially in windy conditions it becomes extremely dangerous and should not be attempted.
Disclaimer:
This information is provided in good faith and is believed to be accurate. In deciding to use this route description you have agreed that Kerry Mountain Rescue Team or the author of this text cannot be held responsible in any way for the accuracy of the information contained herein, or for any accidents which occur to a person using this route description, howsoever caused.
View the Devil’s Ladder Route in images
 route.")
.")


")
")
")
View Brother O’Shea’s Gully Route in images


View the Coomloughra Route in images


